Time for a reality check. I'm sowing seeds in succession and checking my list for March. So, what shall I start off today indoors? Big decisions. I'm going for Nine Star Perennial and Calabrese.
MARCH:
Parsnips
Carrots Early
Little Gems succession
New potatoes - Lady Christ
Spring onions
Chives
Celery
Nine Star Perennial
Tumbling tom
Tomatoes
Lettuce leaved basil
Courgette
Salad leaves in succession
Calabrese (Waltham)
Sunday, 28 February 2010
Thursday, 25 February 2010
What to plant in March
Only a few days left of this month. It's still really cold outside and I've got a sick child to watch over today so I'm using this quiet time to consider what to plant (and what to plant out) in March. The story so far:
Broad Beans
I've started these off in root trainers. They're outside at the moment in the courtyard. Broad Beans can germinate in fairly cool conditions so I'm just leaving them be just now and hoping they'll get going soon.
Tomatoes
My seedlings germinated a few days ago. I've left them on a bright windowsill, but won't consider putting them outside in the unheated mini-greenhouse yet as it is far too cold still.
Little Gem lettuces
The first batch of these germinated about ten days ago - again - I feel it's too cold to put them in the greenhouse outside.
Time to check the weather forecast and think about what to sow next. Oh dear, it isn't good news. No chance of the weather warming up this week. Let's hope they've got it wrong...
Tuesday, 23 February 2010
Allotment Plan
 By special request. This is quite definitely a 'working allotment plan'. Didn't take me long to do - nothing fancy. Doesn't do the beautiful plot justice though. As to the size of the plot...not very good at exact measurements (I pace things out usually when I'm there) - I get the impression though that our plots are larger than most.
If you click on the photo you should be able to see a larger version of it. The plot-and-a-half is L-shaped. The boxes outlined in red are my Rotation Beds. The remaining features marked with a 'P' are all either permanent plantings or perennials. The next photograph shows which beds are planted up and which need to be filled. Looking at the photograph and the plan - I'm starting to feel we're doing well. The allotment was derelict in 2005.

My planting plan for the crop rotation beds:
1. Autumn sown onions (already sown last year)
2. Same
3. Same
4. Flexible
5. Autumn sown garlic (already in)
6 Flexible
7. Flexible
8. Flexible
9. Lady Christl new potatoes (chitting)
10. As bed 9
11. Broad beans Sutton small (started already in root trainers in courtyard at home)
12. Carrots (sharp sand mixed in beds)
Yet to decide: for flexible beds celery, lettuces, parsnips, calabrese...
My working definition of crop rotation at present is don't plant the same crop twice in the same place twice. Anything else is too stressful at the moment and the soil is not yet in danger of becoming exhausted as it has had so much organic matter added.
Tomatoes, basil, salad leaves in the courtyard at home. That's it!
Monday, 22 February 2010
Allotment Plan
A special 'hello' to the friend who describes herself as old (no such thing as 'old' I reckon)...and suggests my doing an allotment plan - well, yes, love to, it's just that I'm really RUBBISH at drawing - but for your sake I'm going to try to have a go...I realise it might be useful for those following this...by the way seem to have mislaid your contact details...hope to be in touch then...before too long...
best
Frances
best
Frances
Monday, 15 February 2010
Spring Flowers (Pansies)
 I'd almost given up on these pansies in our courtyard and was about to whip them out and sow something else. Looks like I won't need to now - flowers in a few days perhaps! What a relief - something has started to grow! And what a striking colour!
Sunday, 14 February 2010
Composting systems...
Today's allotment battlefield site...
After waxing lyrical last week about the labour-saving benefits of a no-dig system - here I am contradicting myself and engaging in two and a half hours of hard physical work. I've decided I want to re-locate the compost heap. No time like the present.
More than one reason for this. Firstly our allotment-and-a-half is L-shaped. Aesthetically speaking - it would be really nice to visually connect the two parts of it, and most importantly as far as I'm concerned - to be able to gaze at the flowering cherry plums which frame the half-plot in my tea break!
The wooden slot-together compost heap originally stood on the left of the picture - last year this was quite a good place for it as I hadn't cleared the bindweed from the ground on the right of the path. But I really wanted to move the structure to the right as soon as I could.
I've got a rough idea of how much green waste we produce per year and how quickly it rots down. We're going to need some huge empty containers again this year, and we're going to need them at the start of the season. I don't want to be moving compost heap containers whilst I'm trying to sow seeds. So the work I did today really needed to be done now. It has been dry this week (never, ever try turning or moving a compost heap after a rainy spell - it's DISGUSTING work).... the sun was shining a little, I figured if I did the work quickly today the worms wouldn't mind too much and I could tuck them up again before the cold of evening descended.
That was the plan, anyway. I should have learned my lessons by now though I mean NOTHING, BUT NOTHING on the allotment goes exactly to plan...
The wooden compost bin itself was bought the year before last. It set us back around a hundred pounds - about a third of our current allotment budget. Expensive then. I expected it to last more than two years and I expected it to be able to move it.
Somewhere I'd miscalculated. I could take it apart alright, but when I tried to put it back together I discovered that the wood had rotted in a number of places and that some of the screws which held the joints together had fallen out. Maybe I should have taken the time to paint it in eco-friendly wood preservative? Admittedly I could have been more patient with the re-assembly, but it wasn't easy by any means.
Anyway, to be really truthful, I think I would now advise against the purchase of such a system for an allotment holder. Sure it looks fairly neat, but it doesn't seem to last long and if you have even basic joinery skills (I struggle with this one) - you could easily make your own. Lessons learned.
Another fairly expensive purchase last year were the cloches you can see on the right of the picture. Someone once told me you didn't need gimmicks to grow fruit and veg. I understand what they meant now. In theory these cloches are a brilliant idea and they look quite fetching. But in practice they are almost impossible for me to use on the plot. The ends tend to fall off. The biggest difficulty in practical terms is that you need to check them (or lift them to water or ventilate) on a regular basis. If I'm only aiming to visit the plot twice a week I simply can't do this so they are practically useless. Unless I use them without the ends, which I may do occasionally.
Back to the compost heap structure. I feel there is an awful lot to be said for a simple pile, covered up with tarpaulin. Here's the next picture in the series, the composting structure is duly moved to the right hand side of the path:
That's a relief. I seem to have lost some of the slats on the way, though, I suppose they'll turn up sometime...
The good news is, there's lots of almost-ready compost in a huge pile on the left and two more large empty compost bins ready for spring. I'm going to have to put a few nails in this frame now to hold it together as due to the rotting wood it's looking a bit rickety, but I'm sure we'll manage that. We're not the Ideal Homes exhibition, after all.
I've covered the almost-ready compost up with a frost protection sheet. There are so many worms in the pile I need to look after them - so that they'll be fighting fit to start their work as soon as the weather warms up. It's going to be a cold night tonight.
A final picture before I go. This is what I mean about the L-shaped plot. Once I've ditched the cream coloured frost protection sheet and the small trees show their leaves - it will all look much better. Looking forward to those cherry plum flowers this year. Fingers crossed. The plants didn't flower last year. I assume they take a while to get established. Either that or there weren't enough pollinators around last year. The newly-established beehive on our site will no doubt help things along on this front, no doubt.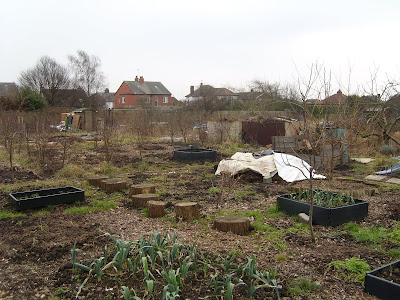
As for the spot where the compost heap structure used to be - I've created more space now and I'm dreaming of a grape vine...

After waxing lyrical last week about the labour-saving benefits of a no-dig system - here I am contradicting myself and engaging in two and a half hours of hard physical work. I've decided I want to re-locate the compost heap. No time like the present.
More than one reason for this. Firstly our allotment-and-a-half is L-shaped. Aesthetically speaking - it would be really nice to visually connect the two parts of it, and most importantly as far as I'm concerned - to be able to gaze at the flowering cherry plums which frame the half-plot in my tea break!
The wooden slot-together compost heap originally stood on the left of the picture - last year this was quite a good place for it as I hadn't cleared the bindweed from the ground on the right of the path. But I really wanted to move the structure to the right as soon as I could.
I've got a rough idea of how much green waste we produce per year and how quickly it rots down. We're going to need some huge empty containers again this year, and we're going to need them at the start of the season. I don't want to be moving compost heap containers whilst I'm trying to sow seeds. So the work I did today really needed to be done now. It has been dry this week (never, ever try turning or moving a compost heap after a rainy spell - it's DISGUSTING work).... the sun was shining a little, I figured if I did the work quickly today the worms wouldn't mind too much and I could tuck them up again before the cold of evening descended.
That was the plan, anyway. I should have learned my lessons by now though I mean NOTHING, BUT NOTHING on the allotment goes exactly to plan...
The wooden compost bin itself was bought the year before last. It set us back around a hundred pounds - about a third of our current allotment budget. Expensive then. I expected it to last more than two years and I expected it to be able to move it.
Somewhere I'd miscalculated. I could take it apart alright, but when I tried to put it back together I discovered that the wood had rotted in a number of places and that some of the screws which held the joints together had fallen out. Maybe I should have taken the time to paint it in eco-friendly wood preservative? Admittedly I could have been more patient with the re-assembly, but it wasn't easy by any means.
Anyway, to be really truthful, I think I would now advise against the purchase of such a system for an allotment holder. Sure it looks fairly neat, but it doesn't seem to last long and if you have even basic joinery skills (I struggle with this one) - you could easily make your own. Lessons learned.
Another fairly expensive purchase last year were the cloches you can see on the right of the picture. Someone once told me you didn't need gimmicks to grow fruit and veg. I understand what they meant now. In theory these cloches are a brilliant idea and they look quite fetching. But in practice they are almost impossible for me to use on the plot. The ends tend to fall off. The biggest difficulty in practical terms is that you need to check them (or lift them to water or ventilate) on a regular basis. If I'm only aiming to visit the plot twice a week I simply can't do this so they are practically useless. Unless I use them without the ends, which I may do occasionally.
Back to the compost heap structure. I feel there is an awful lot to be said for a simple pile, covered up with tarpaulin. Here's the next picture in the series, the composting structure is duly moved to the right hand side of the path:

That's a relief. I seem to have lost some of the slats on the way, though, I suppose they'll turn up sometime...
The good news is, there's lots of almost-ready compost in a huge pile on the left and two more large empty compost bins ready for spring. I'm going to have to put a few nails in this frame now to hold it together as due to the rotting wood it's looking a bit rickety, but I'm sure we'll manage that. We're not the Ideal Homes exhibition, after all.
I've covered the almost-ready compost up with a frost protection sheet. There are so many worms in the pile I need to look after them - so that they'll be fighting fit to start their work as soon as the weather warms up. It's going to be a cold night tonight.
A final picture before I go. This is what I mean about the L-shaped plot. Once I've ditched the cream coloured frost protection sheet and the small trees show their leaves - it will all look much better. Looking forward to those cherry plum flowers this year. Fingers crossed. The plants didn't flower last year. I assume they take a while to get established. Either that or there weren't enough pollinators around last year. The newly-established beehive on our site will no doubt help things along on this front, no doubt.
As for the spot where the compost heap structure used to be - I've created more space now and I'm dreaming of a grape vine...
Thursday, 11 February 2010
A vegetable planner
There are masses of vegetable planners out there, but I wanted to make ours as simple as possible. A simple sowing plan designed so that we don't miss any windows to plant seeds. Tick off when done... :
FEBRUARY: Broad Bean - Sutton Plant in Root trainers - 16 plants
Tomato Money Maker Started off indoors paper pots 11th. Feb
Little Gems Indoors 11th Feb
MARCH: Parsnips
Carrots Early succession sow
Little Gems succession sow
New potatoes - Lady Christl
Spring onions
Chives
Celery
Nine Star Perennial
Tumbling tom Tomatoes
Lettuce leaved basil
Courgette
Salad leaves in succession
Calabrese (Waltham)
APRIL Any I've missed or those which have caught the frost/slugs
MAY Leeks Early In plug planters, Leeks Late
JUNE
JULY Winter cabbage
AUGUST Radicchio for the winter
SEPTEMBER
OCTOBER Onions, garlic
NOVEMBER
December
Monday, 8 February 2010
Putting your seed order together
Looking back at journals and seed orders can be really useful. This is what our first seed order of the year looks like. (I buy from the Organic Gardening Catalogue by post and make the most of the member's discount). I'm a little late with the seed order this year - had to source my first early new potatoes Lady Christl from elsewhere as they've run out. There's plenty of information on the Organic Gardening Catalogue site - about planting times and the advantages of different organic varieties.
1 x CARROT Amsterdam Forcing £1.43
1 x CARROT Paris Market £1.43
1 x CARROT Resistafly F1 £1.98
1 x BROAD BEAN The Sutton SMALL £1.43
1 x LETTUCE Little Gem £1.15
1 x LEEK Monstruoso de Carentan £1.85
1 x LEEK St. Victor £2.71
1 x ONION White Lisbon Winter Hardy £1.43
1 x ONION White Lisbon 10g £1.98
1 x CHIVES £1.64
1 x CELERY Tango £2.71
1 x BROCCOLI Nine Star Perennial £1.85
1 x TOMATO Tumbling Tom £1.85
1 x Basil Lettuce Leaved £1.43
1 x NUTRIENTS FOR COIR BRICKS £1.70
1 x PAPER AND COIR POTS 25 pots £4.95
Garden Organic Member Discount (Not applicable to Special Offers):
-£3.15
Shipping:
£0.00
Total:
£28.37
We're not going to grow main crop potatoes this year. They take up too much space and need too much watering. We're not bothering with runner beans either as you need to pick them so often. In spring and summer I'm hoping to get away with twice weekly visits to the plot. Not had much success with carrots yet - (due in part to the heavy clay soil) - but we're going to try again and with the help of hundreds of worm allies and a bag or two of sharp sand mixed in to the beds, we're hoping for good results.
Here is last year's order for comparison:
http://questionersgardentime.blogspot.com/2009/01/my-january-seed-order.html
We've resolved to spend £30 a month on the allotment (including our £36 and £18 allotments bill). Total: £360 minus £54 leaves £306 to spend on seeds, manure, mulch, pots, e.t.c.
Wonder if we'll come in on budget this year. In the past few years I've made a few (expensive) mistakes. Buying a hosepipe system that I couldn't use because the water pressure wasn't good enough. I've got a few seeds left from last year that I need to make the most of too...
Sunday, 7 February 2010
Spring Plantings. Preparing the ground. No dig.
 Today I spent a mere three hours out on the allotment. Pretty much working consistently, but with time for fairly leisurely tea breaks. I'd like to share a 'before' and 'after' picture with you.
As regular readers will know, I adopted no-dig techniques about two years ago. We're in our fourth year of the allotment now. There are two basic steps to  the no-dig approach.
 the no-dig approach.
1.First you need to remove the perennial weeds from the ground (the types of weeds will vary according to the region you live in and the soil conditions). We're talking about things like dandelions - any weeds that come back each year.
2. Once you've completed step one, you need to use a mulch on your piece of ground to prevent weeds returning and most importantly, provide some food for your worms. They need to feel happy, reasonably warm and sheltered - and if you look after them they'll reward you by doing the digging!
Some gardeners and plot-h0lders seem quite sceptical about the no-dig approach. Some people like digging. Can't see the point in it myself. I observed one of my neighbours working very hard 'digging in' the cow manure that they had had delivered today. It seemed to take a long time (at least a few hours). It was really heavy work, unpleasant, smelly and dirty.
As a no-dig gardener, I use manure too. But I don't dig it in. At the top of this post in the 'before' picture you can see one of the areas I prepared for planting today (using no-dig techniques). This particular bed is destined for new potatoes which I shall be chitting soon. I usually plant them out in the soil in early March.
Back at the end of October last year, I started preparing this no-dig bed. There were quite a few weeds on it. Feeling a bit lazy I covered them up with cardboard and placed a thick layer of rabbit manure on top. I'd never tried this before, but basically I hadn't touched the bed since then at all.
Today, I could see that most of the cardboard had been dragged down by worms, and had rotted away. Most of the rabbit manure had been dragged down into the soil too. So instead of digging all I had to do was to 'loosen and lift'. The soil was beautiful, crumbly, not at all waterlogged and even on this fairly cold day in February, jam packed with worms. As I worked I tried not to disturb the soil too much to give the worms a chance to settle down again and carry on doing their job, eating up the rest of the rabbit manure and cardboard and producing worm casts.
My 'loosen and lift' weeding session took me less than an hour. The second picture shows the same area when I had finished. I decided I wasn't going to rake the area over - as I'll be checking briefly again for weeds wh en I put the potatoes in. You can see how crumbly and well-drained the soil is now.
 en I put the potatoes in. You can see how crumbly and well-drained the soil is now.
 The no-dig approach meant that I had much more time and energy for other tasks that needed to be done in preparation for Spring. Pulling leeks for example. We've still got masses.
Some are quite small - probably because they went in too late in August - but all of them are untouched by white rot (I feel that is due to the no-dig technique too). Here's a picture of the pile - note the crumbly texture of the soil they are lying on. What a difference four no-dig years have made...to the heavy, water-logged clay soil we started out with.
Subscribe to:
Posts (Atom)